ABOUT THIS BLOG

"A Faithful Attempt" is designed to showcase a variety of K-12 art lessons, the work of my art students, as well as other art-related topics. Projects shown are my take on other art teacher's lessons, lessons found in books or else designed by myself.
Thanks for visiting!
LAND ACKNOWLEDGEMENT I acknowledge, with deep respect, that I am gathered on Treaty 7 territory. I acknowledge the many First Nations, Métis and Inuit whose footsteps have marked these lands for generations. I recognize the land as an act of reconciliation and gratitude to those whose territory we reside on or are visiting.

Sunday, May 28, 2017

Circle Grid Trees


This is a wonderful lesson to teach towards the end of a school year. It's fun, it's colourful and it's summery. But, it also takes quite a bit of focus and patience; a perfect art project for when the kids (and teacher!) are getting antsy for summer vacation. I've definitely noticed all of my classes starting to get louder, more hyper, so this is the time of the year when I pick my lessons very carefully in order to create a sense of calmness in the Art Studio.

This circle grid tree lesson is all over Pinterest, but I followed the excellent lesson found on the wonderful art website "Art Projects for Kids". Thank you as always Kathy!

I printed off the grid template onto regular photocopy paper. You could also print it onto cardstock if you want to paint these (I've yet to figure out how to manually feed cardstock into our complicated school photocopier!!)
I made two sizes: regular 81/2 x 11" small paper for the slower students and 
then blew it up to 11 x 17 for the faster students. 

I taught this lesson to a mixed Grade class: Grades 4 - 6.
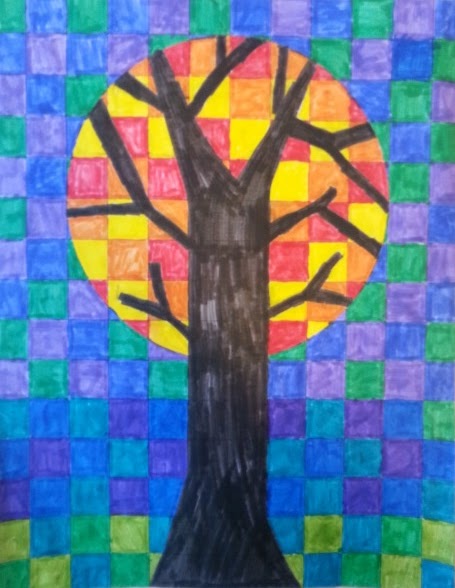
First they sketch out their tree in pencil; many included patterns.


Then some started by outlining their trees in black, brown, etc. Then they used either cool or warm colours to colour their tree, then the opposite for their background. I gave them the option of using markers or coloured pencils. Younger students could also use wax crayons.


Highlighters are also great to colour with!


This project took a surprisingly long time- at least 4- 40 minute lessons to complete.

Some of the Grade 4 - 6 results:


Sunday, May 21, 2017

Foam Sculptures


This is a fantastic lesson that's been on my 'to-teach' list for a few years now. I had always assumed it would be super messy, cutting foam, and I was always afraid of further angering our custodial staff! I think that's part of the reason why I put it off for so long. But it actually wasn't messy at all. Using regular white styrofoam is super clingy and static-y and messy but not this floral foam.

I found the lesson HERE from the United Art & Education website. There's detailed instructions, a PDF and a video! I taught it to my mixed elective class of Grades 10-12. 

So a warning about supplies: I bought this wet floral foam (not dry) at a Dollar Store. It worked the best. I bought a bunch last spring and they sat in my classroom until the winter when my kids finally started this lesson. I needed to buy more foam as a few kids wanted to re-start, but I could not find it in any Dollar Store! It seems it might be a seasonal (Spring/summer) product, at least where I live in Canada. I ended up finding some more at Michaels but it was a different texture and not the same to work with. Plus it was quite a bit pricier and only came in a 5-pack.


You'll also need to gather some flat, open containers for each student to work in and contain the carving mess. Box lids worked great; I always try to snag the box lids that our photocopy paper comes in at school.
Tip: a great place to find flat boxes is liquor stores! (beer flats- they're great!)


For the carving tools. we simply used plastic utensils and bamboo skewers.
The foam is so soft that you can carve it with any basic tools. You can also smooth everything out with simply your fingertips or a very fine grit sandpaper.


I also cut some wood into small rectangles to be used as bases if the students wanted to mount them.


Initially I wanted to the kids to create an abstract sculpture but some ventured into figures. I showed slideshows of both Henry Moore as well as Jean Arp (LOVE). We also talked about subtractive sculpture. Then the kids went to town carving. The foam is really soft so it will show any indentation where the kids grip it too hard. So just be aware of that.


Once carved, we primed ours using cheap white house paint. I put it into a squeeze bottle for easier dispensing for the students.


We stored our projects in a shelf. Once primed and dry, students painted them using acrylic paints. 
I bought a whole bunch of different shades of metallic craft paints from Michaels.
Once dry, you can also spray varnish these for extra protection.


The kids seemed to quite enjoy this project and I can't wait to teach it again!


Wednesday, May 10, 2017

Mother's Day Ice Cream Cones


My Grade 4' made the super adorable ice cream cones for Mother's Day.
I found the idea HERE  on the website "A Cupcake for the Teacher". 
I altered her project a bit to allow for some more choices for my students.

I prepped the lesson by cutting lots of different colours of 9 x 12" construction paper in half. Light brown was for the cone and then some ice cream 'flavours' (strawberry, pistachio, etc). Strawberry/cherry was clearly the favourite!

They started off with making their cone and then drew on the texture lines using a brown coloured pencil. This was cut out. They used the shape of their cone to determine the size of the ice cream scoops(s).  Once those were cut out they could add any kind of topping like chocolate sauce or whipped cream and a cherry. 

On small scraps of coloured paper they wrote out adjectives describing their moms. These were cut out into little 'sprinkle' shapes and glued onto their ice cream.
These ended up being a bit too flimsy for my liking so I took the time to laminate them all.
I loved how they all turned out and the kids loved them even more! 
All in all, this took about 2- 40 minute periods to complete. 


Related Posts Plugin for WordPress, Blogger...